Watch how to apply Headings and custom CSS Text Styles to your webpage using the Ecommerce Templates content management system and CK Editor.
This video is best viewed in full screen HD 1920 x 1080 pixel resolution.
The CSS Styles that appear in your CK Editor drop-down menus are designed to make formatting your webpage layout extremely simple and quick, with mobile friendly responsive scaling features built in. Basic styles will be similar across IT ZAP websites, with perhaps some special purpose variations added upon request.
Headings h1 through h6
Text entered as a Heading carry extra significance for Search Engine Optimization purposes. According to Hoyle, there should only be one Heading 1 <h1> entry for each webpage.
-
Because the text you entered in the "Prod Name" field will become the Heading 1 <h1> for your webpage, you should not add any more <h1> headings here in the CK Editor window.
-
The next Heading you add here should be a Heading 2 <h2>. And following that, select a Heading 3 <h3> and so forth in numeric sequence through to Heading 6 <h6>. But there is no Search Rank penalty if you used multiple <h2>, <h3>, etc.
-
All Headings <h2> through <h6> are the same font size, which is scaled down on smaller mobile screens.
-
Simply enter a line of text as a plain paragraph.
-
Position the cursor on that line, open the "Format" drop-down menu that contains Heading Styles and select the appropriate Heading Number.

What the "Source" HTML code will look like:
<h2>Headings h1 through h6</h2>
How to change the Heading Color
The default Heading colour will match the colour scheme of your website. But you can easily apply a different colour to the entire Heading line, or just a section <span> of words in the line.
-
Select the entire Heading line, or just a section <span> of words.
-
Open the "Styles" drop-down menu and scroll down bottom to find Inline Styles containing various colours labelled span.xxx. (Those ending with the letter "b" are a bold font, like you can see.) Select any colour desired.

-
Alternatively, you can open the CK Editor Toolbar "Text Color" drop-down (just to the right of the U icon) and select a colour from there.

What the "Source" code will look like:
<h3><span class="darkgreen">How to change the Heading Color</span></h3>
or
How to change a section of the Heading Color
<h4>How to <span class="red">change a section of the</span> Heading Color</h4>
Horizontal Line
Headings help to itemise the content of your webpage and make it more readable. You can also Insert a Horizontal Line to seperate content.
-
Press the Enter key to start an new paragraph.
-
Click the Horizontal Line Icon to be found in the second row Toolbar, just to the left of the
 icon.
icon.

<hr />
Paragraph Styles
Most of your webpage content will be made up of plain paragraphs. You can use the standard CK Editor Toolbar to apply text styles like Bold, Italic, Underlined, align centre or right, etc, in exactly the same manner as you would in any text editor software like Microsoft Word.
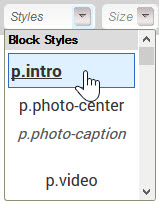
But open the "Styles" drop-down menu and you will find more options to apply custom IT ZAP font styles, colours and alignments. There are even paragraph styles especially intended to contain photos, YouTube videos and Google Maps that automatically resize content on smaller mobile screens.
p.intro
Every newspaper article begins with an introduction paragraph in bold and slightly larger print. This first paragraph is intended to attract the reader's attention and generate their interest to proceed and read more.
I call this style "p.intro" and I also CTRL+C copy and CTRL+V paste this introduction paragraph into the "Short Description" box to tell the Search Engines this is exactly what we want to appear in Search Results.
-
Select the first paragraph line.
-
Open the "Styles" drop-down menu and select the "p.intro" style.

What the "Source" code will look like:
<p class="intro">Every newspaper article begins with an introduction paragraph in bold and slightly larger print. This first paragraph is intended to attract the reader's attention and generate their interest to proceed and read more.</p>
p.photo-center
p.photo-caption
-
Start a new paragraph line.
-
Insert an Image inside that line. (Use the Toolbar Icon to left of "Source")
-
Click on the photo and then apply the "p.photo-center" style.


Start a new paragraph, describe the photograph and then apply the "p.photo-caption" style
p.video
p.video100
Used to insert a YouTube or Vimeo video or a Google Map into your webpage. There is a Webmaster Video demonstration here ⇒
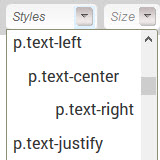
p.text-left
p.text-center
p.text-right
p.text-justify
These are simple text alignment class names taken from the Foundation CSS Framework used to build your website.

This paragraph of text is aligned to the left which is the default, so you would rarely use this style.
<p class="text-left">This paragraph of text is <strong>aligned to the left</strong> which is the default, so you would rarely use this style.</p>
This paragraph of text is aligned in the center. Notice the American spelling of the word center. Yes, you could have used the Alignment Icons in the CK Editor Toolbar to achieve the same thing. But using CSS classes rather than inline styles is better practice.
<p class="text-center">This paragraph of text is <strong>aligned in the center</strong>. Notice the American spelling of the word center. Yes, you could have used the Alignment Icons in the CK Editor Toolbar to achieve the same thing. But using CSS classes rather than inline styles is better practice.</p>
This paragraph of text is aligned to the right.
<p class="text-right">This paragraph of text is <strong>aligned to the right</strong>.</p>
This paragraph of text is justified across the width of the screen. You will need to enter a sufficient quantity of text to fill an entire line, before you see this style take effect. The last character in the line will be aligned to the extreme right, with spacing between words adjusted evenly.
<p class="text-justify">This paragraph of text is <strong>justified across the width of the screen</strong>. You will need to enter a sufficient quantity of text to fill an entire line, before you see this style take effect. The last character in the line will be aligned to the extreme right, with spacing between words adjusted evenly.</p>
span.red
span.redb
span.darkred
span.darkredb
span.crimson
span.crimsonb
span.blue
span.blueb
span.darkblue
span.darkblueb
span.darkgreen
span.darkgreenb
All these are basic colour styles you can quickly apply to text in a paragraph, or a heading. Those styles ending with the letter "b" are a bold font, like you can see.
<p>All these are <span class="darkblueb">basic colour styles</span> you can <span class="crimson">quickly apply</span> to text in a paragraph, or a heading. Those styles ending with the letter "<strong>b</strong>" are a <strong>bold font</strong>, like you can see.</p>
-
Select an entire paragraph, or just a section <span> of words.
-
Open the "Styles" drop-down menu and scroll down bottom to find Inline Styles containing various colours labelled span.xxx. Select any colour desired.

-
Alternatively, you can open the CK Editor Toolbar "Text Color" drop-down (just to the right of the U icon) and select a colour from there.

-
And you can use the CK Editor Toolbar "Background Color" drop-down, if desired.

REMOVING STYLES (major tip !)
So you applied a Style to a paragraph and then decide “NOPE”, I do not like that. Or you pressed the Enter key to start a new paragraph and started typing, only to discover that the Style from the previous paragraph had been carried across into the next paragraph.
Well, removing a Style from an entire pararaph, a section <span> of text, a bulleted list or numbered list is very easy.
-
Use your mouse to select and highlight the entire paragraph, list of items or section <span> of text you wish to remove the style from.
-
In the bottom row of the CK Editor Toolbar, click the “Remove Format” icon. (It looks like a rubber eraser.)

Alternatively, my preferred method is to use the "Tag Inspector" bar down the very bottom of the CK Editor window to select the portion of text you wish to remove styles from.
-
Click in the area where you wish to remove text styles.
-
In the "Tag Inspector" bar click on the <p> tag, or <span> tag, <ul> or <li> tag to select and highlight the text area that you wish to alter.

-
Now click the "Remove Format" icon.
Or, now that you have a good idea about what the raw HTML code looks like, you can click the "Source" icon in the Toolbar and manually edit the HTML code by hand to remove the styles you do not want, or add new styles.