“A picture is worth a thousand words.” And that is most certainly true on the internet. Giving your website visitors a really good look at what is being offered for sale, or the topic of an article, can make all the difference.
Magic Slideshow is the perfect tool for adding an impressive slideshow presentation to your webpages, with full screen view option. A key feature of all I.T.ZAP websites, the software is seamlessly integrated into the Ecommerce Templates "Image Manager".
Image Filename Best Practice
You will be surprised about how many extra website visits you can get from Google “Image Search” alone ! For additional Search Engine Optimization, give each photograph a descriptive-filename.jpg
But just as important, descriptive filenames will help you find images on the website server whenever you want to insert a particular photo into a webpage.
-
Press the F2 key to Rename a file. (Or right-click and select Rename.)
-
NO spaces in filenames, use-dashes-to-separate-words and use all lower case letters.
Note that filenames for the web are all CaSeSensiTive. To avoid errors, confusion and mistakes, webmaster best practice is to always use lower case.
Image Aspect Ratios
The default aspect ratio for Small Preview Images is now 4 x 3 because digital cameras and iPhones generally take photos in that ratio. And so this way there is no need to edit those original photos, other than to give them a descriptive filename.
Your website CSS style sheet will automatically rescale images downward on smaller iPad and iPhone screens to fit the image container, according to the maximum width and height available.
(Personally, I prefer to crop images to a 16 x 9 widescreen aspect ratio, which matches the aspect ratio of a Full HD Resolution Computer Screen 1920 pixels wide x 1080 pixels high. But that does require using image editing software on your PC. Websites can be configured for a 16:9 aspect ratio upon request. The choice is yours.)
Image Heights for your first Small, Large and Giant photo
There are 3 separate image sizes, each sized differently according to HEIGHT. Sizing by height makes the image aspect ratio 16x9, 4x3 or 1x1 square totally irrelevant.
-
In this example we have multiple images to upload, and so we begin by clicking the 3 blue ... dots in the Giant Image column. To upload your second and subsequent images, you click the 3 blue ... dots beside the rows underneath.


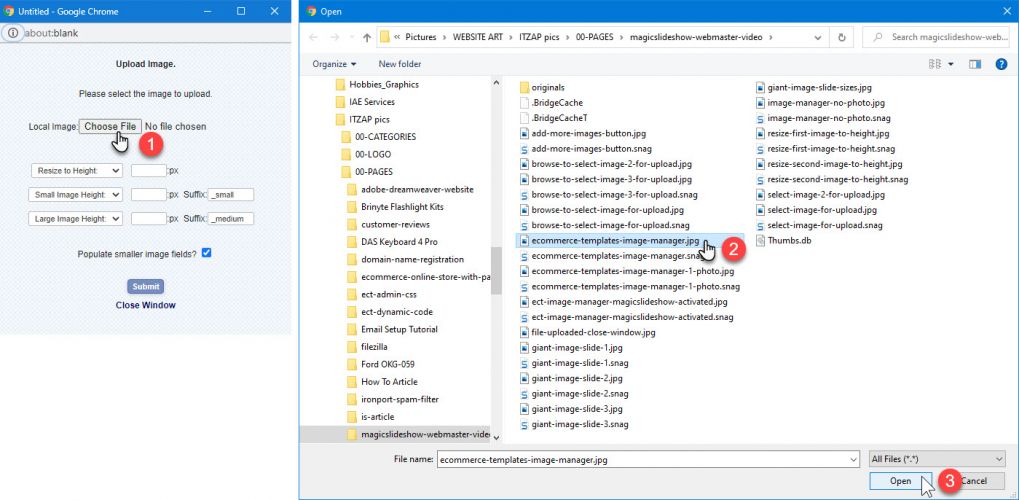
Browse to select the first image to upload.

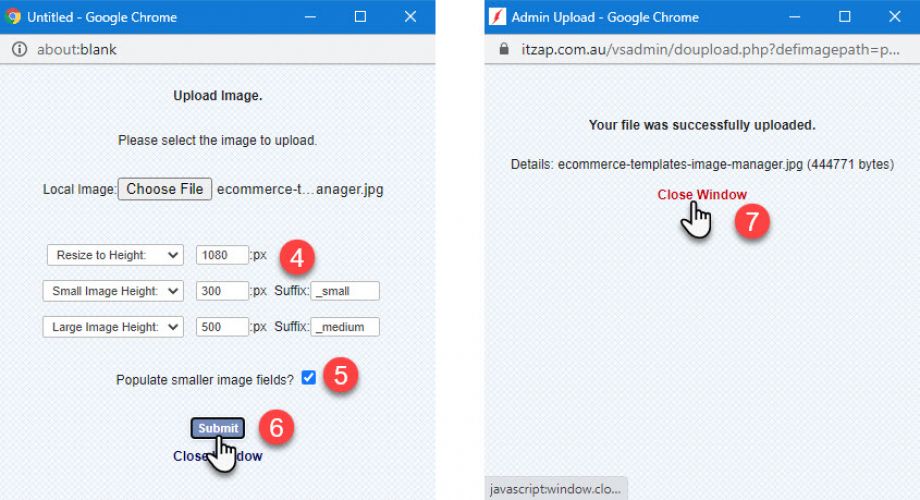
Resize the first Giant, Small, Large images to your desired HEIGHT.
(1) Small Image is a preview photo that appears on the products.php summary page. You only need ONE of these. Make the HEIGHT 300 pixels and that will fit perfect. The maximum WIDTH permitted is 400 pixels. So an image 400 x 300 pixels is ideal. You can upload a smaller image size if desire.
(2) Large Image appears here on the webpage. I recommend you make this image HEIGHT 600 pixels. However, if your original photos are a nice large size, then feel free to set a taller HEIGHT up to 700 pixels. Images will downscale fine on small mobile screens. Or maybe you would rather make the Large Image height smaller. The choice is entirely yours.
-
It is important to note that the dimensions of the first Large Image you upload will determine both Width and Height of your Magic Slideshow, even if subsequent photos are larger.
(3) Giant Image is the photo displayed in Fullscreen Mode when the visitor clicks the X in the top right corner. Make this image HEIGHT 800 pixels for a reasonable download filesize, or up to 1,080 pixels HIGH if your original photo is high resolution. Upsizing photos larger than the original dimensions will result in “fuzzy” images and is not recommended.
If your original source image is only small, then set your upload HEIGHTS according to what you think will look acceptable on-screen.
If you do not like the result, then simply repeat the Upload Image process, enter different HEIGHTS, and the previous images will be overwritten.
Can you size images by WIDTH instead ? YES you certainly can !
Maximum widths to set would be: Small 400 px, Large 1200 px, Giant 1920 px.
Image Heights for second and subsequent photos
-
This time you do not need a Small Image. So remember to open the middle drop-down and select "No Small Image". You may like to alter the Large and Giant image heights, just depending upon the original source photo resolution.

Browse to select your second image for upload.

Select "No Small Image" and then resize Giant and Large to your desired Height.

Browse to select your third image for upload.

This time I altered the Giant Image Height to 500 px, because the original jpg photo was only 460 px high.
As you proceed, notice that Image Resize Heights are retained, according to your previous upload settings.
When done, the Image Manager file list will look something like this …

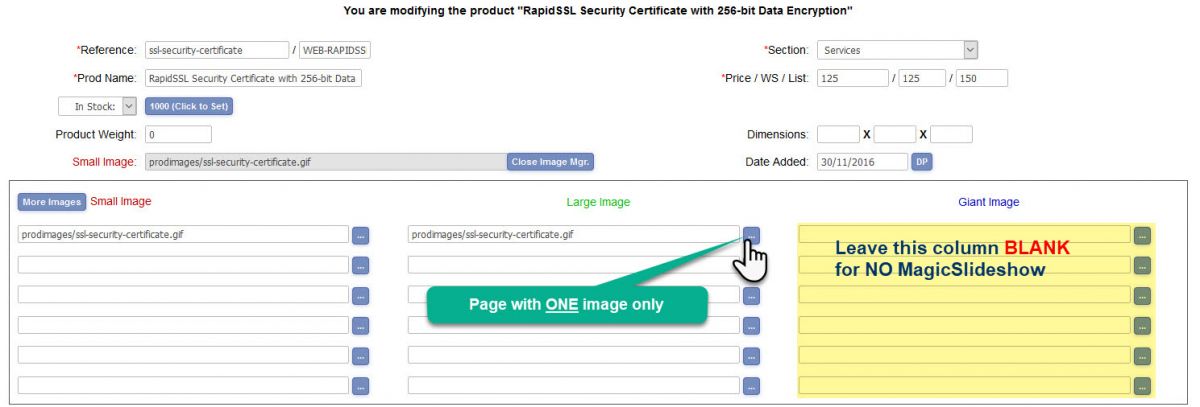
I only have ONE image
If you only have one image and do not wish to activate MagicSlideshow, then simply leave the Giant Image column blank. Set the image HEIGHT to whatever you desire.

I do not really have ANY appropriate image to display
In that case, you can use your Business Logo. In the Small and Large columns simply type “logo.jpg” and leave the Giant Image column blank.

-
NEW in v7.5.7 released April 2023 – If you do not have any image your logo.jpg will be used automatically. You can leave all fields in the Image Manager blank.
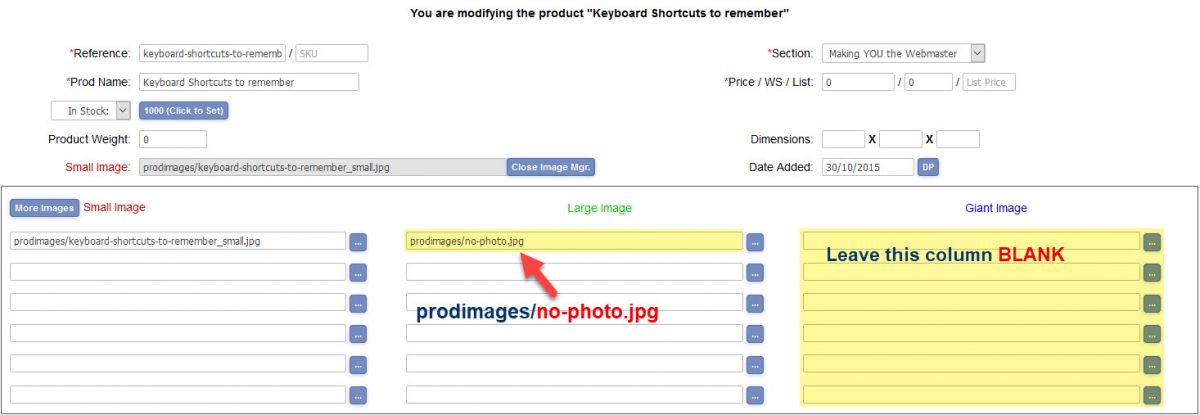
I DO NOT wish to show any photo at all
Open the Image Manager and in the Large Image column type this: prodimages/no-photo.jpg

This is a bit of a hack. It actually displays a white square 1x1 pixel in size, but does achieve the desired result.
Please note: You still really do need to display some photo in the "Small Image" column, even if it is something generic like a business logo.
https://itzap.com.au/
https://itzap.com.au/pics/itzap-ecommerce-templates-accredited-specialist.jpg
117 Princes Highway
Lucknow
Victoria
3875
AU
+613 499 347 269
$399 to $1,500